The Middle East
The Fog of War
The Battle of Sidi Barrani
The Italian forces had halted after the capture of Sidi Barrani in order to accumulate stores for a further advance and to extend the coast road. To cover these preparations they had constructed an elaborate system of fortified camps. These stretched in an arc south and west from the coast east of Sidi Barrani. Their names, in order from the coast to the south-west, were Maktila, the three Tummars (East, Central and West). Nibeiwa, and on the escarpment away to the south, Rabia and the three camps around Sofafi. These camps were each manned by a garrison of about 3,000 and contained ample fire power, including efficient artillery. Indeed, of all the arms in the Italian army, their artillery was highly respected for its discipline and accuracy, even though their equipment was inferior and no match for the British 25-pounders, 6-inch howitzers and 4.5s.
However, British patrols had discovered a grave weakness in the Italian dispositions. Between Nibeiwa and the four camps on the escarpment, Rabia and the Sofafis, was a gap of about 15 miles which was unguarded and apparently not even watched. General Sir Archibald Wavell, GOC-in-C Middle East, boldly decided to exploit this gap despite the fact that only about 36,000 British troops could be employed against an estimated 80,000 of the enemy
General O’Connor’s plan, as agreed by Wavell, was to move two divisions, 7th Armoured and 4th Indian, up to the Enba Gap (as it became known by taking the name of the old Roman cistern, Bir Enba, nearby), there to link up with the Corps Troops, which included 45 heavy ‘I’ (Infantry) tanks, later called Matildas, of the 7th Royal Tank Regiment. These tanks had only just arrived in the theatre and the Italians had nothing even remotely comparable to them because of their 78mm thick armour, which made them practically impervious to anything that the Italian artillery could fire at them. General O’Connor had every reason to believe that their presence was still a secret, but to move them up the 70 miles into the open desert (this in the days before tank transporters) at a maximum speed of 15mph without being seen demanded complete air superiority. This superiority was achieved by stripping the air defences of the entire Middle East and allocating 48 fighters (two squadrons of Hurricanes and one of Gladiators) and 116 bombers (Blenheims, Wellingtons and Bombays) to No. 202 Group. Having concentrated the two divisions, the 7th Armoured was to push through the Enba Gap with its two armoured brigades, driving to cut the coast road about Buq Buq, with the Support Group isolating Rabia and the Sofafis; whilst 4th Indian was to turn north overrunning each camp in turn until reaching the coast around Sidi Barrani. The Mersa Matruh garrison was to be responsible for pinning down the Maktila camp’s garrison, aided by heavy bombardments delivered by the Royal Navy.
Operation Compass |
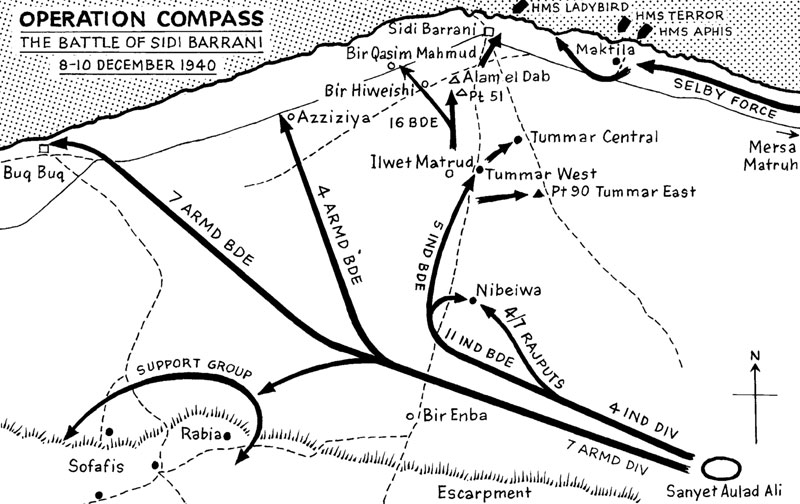
2nd Queen’s first move towards the Enba Gap was carried out on the 6th December to an area far south of Mersa Matruh, and then on the 8th they moved about 50 miles farther west to a new assembly area known as Sanyet Aulad Ali, where they leaguered for the night. The Battalion was then told that they were to be in reserve to the 11th Indian Infantry Brigade, which was to attack Nibeiwa camp supported by the 7th Royal Tank Regiment. At 3am on the 9th December the 4th/7th Rajput Regiment delivered a feint attack on the eastern perimeter of Nibeiwa, but the main 11 Indian Brigade attack, put in from the west just after dawn, was completely successful, so 2nd Queen’s were not required. The Matilda tanks proved that they were quite invulnerable.
2nd Queen’s was then allocated as a reserve to the 5th Indian Infantry Brigade, whose objectives were the Tummars and Point 90. These attacks also succeeded, so the Battalion rejoined 16 Brigade, which leaguered for the night round Ilwet Matrud, about six miles south of Sidi Barrani. The Brigade received orders to attack Sidi Barrani next day.
After first light on the 10th December the 16th British Infantry Brigade deployed, moving forward in lorries of the Cypriot Service Corps. On reaching the start line appalling weather conditions set in, and Brigadier Lomax found himself in something of a dilemma. The supporting tanks and artillery had not appeared because the bitter winds were whipping up thick dust clouds, reducing visibility at times to 50 yards and cloaking them from view. Later it transpired that they were both within about 1,000 yards of Brigade Headquarters! At the same time this fog faded sporadically to the north and gave Brigadier Lomax glimpses of the Italian positions in front, which conversely meant, of course, that they could see his Brigade whenever they happened to look in the right direction. There was therefore as much danger in waiting for the tanks and artillery support as in going on without it. Just after 6am he gave the order to move forward and the Brigade advanced without support with 1st Argylls leading, 2nd Leicesters echeloned back on the right, and 2nd Queen’s in echelon behind on the left. They had covered almost two miles when the wind slackened, the fog parted, and with their usual accuracy the Italian artillery opened fire.
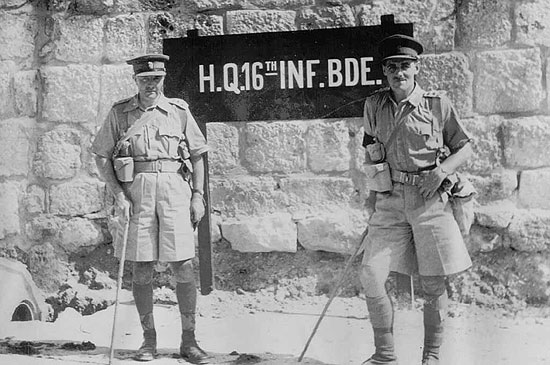
Brigadier C. E. N. Lomax DSO, MC and one of his staff.
The Argylls debussed but were immediately pinned down and started taking casualties. The Leicesters rushed up in support, swinging slightly out to the right, but they also came under fierce fire and were pinned down too. The 2pdr anti-tank guns raced up and opened fire, but they were no match for an enemy who were dug in and firing back over open sights. The situation began to look ugly, with several lorries hit and on fire, and the battle turning into a static fire-fight. The Queen’s had been more fortunate than the other battalions, although Capt S.H.L. Lynwood, commanding ‘C’ Company, was killed by a shell during this action.
However, ten Matilda tanks, guided solely through the dust storm by the sound of gun-fire, came up into position on the left of the Argylls and made contact with 2nd Queen’s. Together they swept past the Argylls and the Leicesters and charged into the western face of the defences, to be immediately enveloped in an even thicker fog as the wind rose again and all the dust and smoke from the shellfire was added to the natural gloom.
In this fog were fought a series of small, close range, vicious battles at section or single tank level. Halfblinded, the Queen’s shot or bayoneted shadows as they rose from the ground before it was known whether they intended to fight or surrender; an unseen machine-gun would fire before being silenced by grenades thrown at random in the general direction of the gun’s bark; a Matilda would come upon a group of puzzled and frightened Italians trying to give themselves up and chase them back into the gloom; and then, identifying the crash of an Italian gun nearby, the tank would slowly turn, and joined by half a section of infantry, would overwhelm it.
Meanwhile, sensing the diversion of the enemy’s attention, Lt-Col R.C.B. Anderson of the Argylls called for a charge, just as the supporting artillery arrived at last through the dust storm and opened fire with a barrage intended for the Italian gun-line. Fortunately for the Matildas and the Queen’s the barrage fell well beyond. The Argylls rose from their positions and, to the sound of sand choked pipes, cleared a series of small hillocks, which turned out to be their original objective of Alam el Dab. By this time they were so close to the Italian gun-line that the gunners could not deflect the guns sufficiently to hit them. The Leicesters also felt the pressure easing and moved forward on the right, whilst 2nd Queen’s reached their objective at Bir Hiweishi astride the east-west track by 9.30am. It was found afterwards that the Battalion had moved straight across the front of an Italian battery whose gunners had taken cover from the storm and therefore had not seen the advance. They were taken prisoner later by 2/Lt A.G. Cheston of the Carrier Platoon. Shelling now lessened, but three Italian aircraft made a low-level attack on the Battalion, luckily causing no casualties.
Suddenly the wind and sand dropped to reveal 2,000 infantry of the 4th Blackshirt Division rising from their trenches just in front, seemingly formed up for a mass attack. The whole of 16 Brigade prepared to go forward again, when it was realised that the majority of the enemy were unarmed and had their hands in the air. They had had enough, and all the Brigade’s final objectives had been taken some time after 10am with a line established along the whole of the western side of Sidi Barrani and part of the southern side. By then 2nd Queen’s had already moved up to the main Buq Buq road at Bir Qasim Mahmud. Commanding officers were sent for by Brigade Headquarters. Lt Col Haggard had a lucky escape when his car was fired on in error and almost hit by British anti-tank guns in the prevailing murk.
Major General N. Beresford-Peirse, the Divisional Commander, was at this conference when the orders were given for the final attack on Sidi Barrani itself. It was to be carried out by 2nd Queen’s on the right and 2nd Camerons from 11th Indian Infantry Brigade on the left, with the start line at Point 51 just south of Alam el Dab. The Battalion moved off eastwards behind the Argylls and the Leicesters, and another low-level attack from the air welcomed them at Point 51. However, the attack got under way just after 4pm with ‘A’ and ‘B’ Companies forward and ‘C’ and ‘D’ Companies in support. Besides an artillery barrage, seven Matildas accompanied the attack, the only serviceable tanks left, whose fourth attack it was that day. There was little resistance, and in less than three-quarters of an hour the Battalion entered Sidi Barrani, having captured over 400 prisoners. 2nd Queen’s consolidated some half a mile beyond the town facing east. During the night they captured a column of about 50 Italian vehicles, mostly medical, seeking to escape from Maktila.
Shortly before dawn the Battalion moved a couple of miles farther east in order to assist in intercepting the Maktila garrison if it tried to break out. In this new position they found many enemy supply dumps and MT.
They also cleared many disused cisterns which brought out numbers of dishevelled Italians eager to surrender. At first there was some intermittent shelling, but this died down, and in the afternoon the Intelligence Officer, Lt J.A. Robertson-Walker, was sent off eastwards to contact Selby Force (named after Brigadier A.R. Selby, commanding the Mersa Matruh garrison) which had captured Maktila and was advancing west, pinning the 1st and 2nd Libyan Divisions against the sea. Within a short distance Lt Jim Robertson-Walker met the carriers of the 3rd Coldstream Guards. The link up of all the various formations involved in the plan for Operation Compass (the code-name of the five day raid into the Italian positions) had now been completed, and the battle for Sidi Barrani had been won.
British and Indian losses during Operation Compass had been less than 700, of whom 9 officers and 144 other ranks had been from the 1st Argylls. The 2nd Leicesters had also suffered heavily, but 2nd Queen’s had been very lucky in its casualties, with one officer and three men only killed, whilst eight other ranks were wounded.
« Previous ![]() Back to List
Back to List ![]() Next »
Next »
Related
