The Middle East
Prelude To Alamein
Alam El Halfa And Deir El Munassib
On the 3rd August Winston Churchill, accompanied by the CIGS, General Sir Alan Brooke, had arrived in Cairo on a visit to HQ Middle East Command prior to a planned visit to meet Stalin in Moscow. His stay inevitably included tours to units of the Eighth Army and the Desert Air Force. What Churchill saw erroded his confidence in Auchinleck’s grip on the situation in his dual role as C-in-C and his self-imposed appointment as GOC Eighth Army. Auchinleck had felt compelled to take over this responsibility from Lieut-General Ritchie after the fall of Tobruk, and, through skillful handling of this dangerous situation, he could undoubtedly claim credit for producing stability from chaos as the Army withdrew back to the Alamein position. However, Auchinleck’s nominee as the next GOC Eighth Army did not receive much support from either Churchill or Brooke. Churchill also perceived that there was a sense of being puzzled as to the reasons for their plight within the Eighth Army; he referred to the troops as being ‘brave but baffled’. They placed the blame firmly on the shoulders of their commanders, and had an unhealthily greater respect for their adversary, Rommel. Furthermore the infantry had lost confidence in the way that armoured units were handled, which in the New Zealand Division amounted to hate, since they had twice found themselves cut off because of the withdrawal of armoured support, and had been forced to cut their own way out to safety. In view of these impressions, Churchill decided that General The Hon. Sir Harold Alexander should replace General Auchinleck as C-in-C Middle East.
The question as to who to place in command of the Eighth Army was not so easily solved. The CIGS had recommended Lieut-General Sir Bernard Montgomery, but since it had already been decided that the unpopular Chief of Staff, Major-General Dorman-Smith, and Major-General Ramsden, GOC XXX Corps, should both be relieved of their appointments, it was feared that such a sweeping change amongst the senior officers might adversely affect the morale of the Eighth Army. The appointment was therefore given to Lieut-General ‘Strafer’ Gott, who had two years continuous experience of desert warfare and was idolized by the rank and file. Unfortunately, whilst flying back from the front to take up his command, the aircraft in which he was travelling was attacked by German fighters, forced down, and caught fire. Except for five survivors, General Gott and all the other passengers perished in the flames. A cable was sent to London asking for Lieut-General Montgomery to be sent out to take command of the Eighth Army at the earliest possible moment, and on the 12th August he duly arrived.
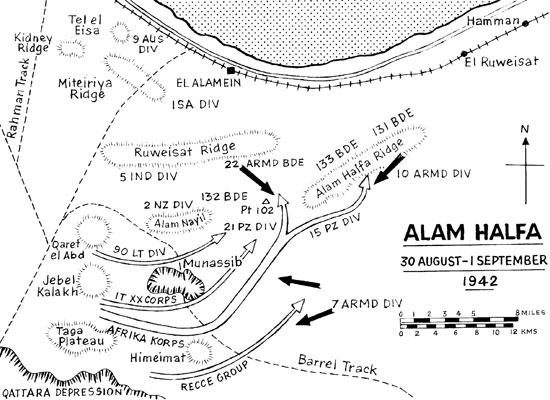
Montgomery showed an immediate grasp of the salient points of the existing situation. Everyone was quite certain that Rommel must either strike soon or abandon any hope of reaching Cairo. There was also general agreement that Rommel would attack during the moonlit period at the end of August, probably with a right hook through the southern part of the Alamein position followed by a drive up to the coast east of El Alamein itself. The focal point of such a manoeuvre would be the Alam Halfa Ridge, which in Auckinleck’s plan was held by the 21st Indian Infantry Brigade under command of the 2nd New Zealand Division, whose main elements were dug in on Bare Ridge on Alam Nayil about 10 miles west. The intention was to draw the enemy on to Alam Halfa and then to launch armoured counter-attacks against his columns from the north with 22nd Armoured Brigade, and from the south with the rest of the 7th Armoured Division, depending on the course of the battle.
Montgomery immediately disagreed with this plan, declaring that there would be no withdrawals, particularly from Alam Halfa, which he intended to turn into a fortress against which Rommel must hurl himself and so perhaps dash his forces to pieces. However there was a problem about where he was to obtain the additional infantry to hold the fortress and more armour to act as mobile artillery and fight from hull down positions alongside the infantry.
The only infantry available was the 44th Division, under Middle East Command’s control, still undergoing training. Although the Division could not yet be considered ‘desert worthy’, the Division had been under Montgomery’s command on the south coast defences, and he was satisfied that in a well dug in position without any requirement to manoeuvre they were quite able to demonstrate the traditional tenacity of British infantry in defence. He asked Alexander to release the Division to Eighth Army as soon as possible, and two days later 131 Brigade and 133 Brigade arrived on Alam Halfa Ridge. 132 Brigade was sent to reinforce the New Zealanders on Bare Ridge. The necessary armour he found by instructing 10th Armoured Division’s Headquarters and the 72 Grants and twelve Crusader tanks of the 8th Armoured Brigade to come up from army reserve and take positions along the crest and to the south of the ridge.
131 Brigade was allocated the eastern end of the ridge, an area known as El Khadim. 133 Brigade was placed at the western end. The 131 Brigade position was held by 1/7th Queen’s on the right nearest the centre of the ridge around Alam El Khadim, with 1/6th Queen’s on the forward southern slopes covering the defences of the airfields in the area and the western gaps in the minefield. 1/5th Queen’s position was on the reverse slope to the north in the area of Barrani’s Tomb. Here the battalions dug in, which was hard work and time consuming in the rocky ground. On the 20th August the Division’s positions were visited by the Prime Minister, whose cheerful words and ebullience gave great encouragement.
By the 25th August the new preparations for the forthcoming battle were in place, even to the extent of using a deception in the form of a false ‘going’ map of the terrain, showing a hard level surface below the Alam Halfa Ridge where in fact there was a patch of soft sand, placed in an old scout car which then ‘accidentally’ blew up on a mine just east of Himeimat and was abandoned by its crew. On the 29th August 44th Division was ordered to be prepared to change over with the 2nd New Zealand Division in the forward area around Bare Ridge on Alam Nayil, and advance parties left battalions to take over. However, an Ultra Intelligence intercept was received indicating an imminent enemy attack, and at 1.30am on the 31st August the codeword “Twelve Bore” was issued indicating this, so the move forward was cancelled.
Alam Halfa.
The attack, as expected, came in the south, and throughout the morning of the 31st the German 15th and 21st Panzer Divisions, with the Italian XX Corps and the 90th Light Division on their left, advanced slowly through minefields between Munassib and Himeimat, harassed by the 7th Mobile Brigade and the 4th Light Armoured Brigade of 7th Armoured Division. At 1.00pm the two panzer divisions, with the Littorio Division close alongside, began their turn northwards along the line of telegraph poles which led straight from Himeimat towards the centre of the Alam Halfa Ridge. For a time a dust storm blew up, which temporarily grounded the RAF, who had achieved virtual air supremacy over the battlefield; but the panzers did strike the soft sand, and the petrol gauges began falling alarmingly. During the late afternoon they reached the point where the line of telegraph poles veered east almost parallel to Alam Halfa Ridge. Here the panzers split, 15th Panzer followed the telegraph posts whilst the others turned due north. The latter group met a mixed force of Grants and Crusaders from 22nd Armoured Brigade in the hills around Point 102. Although some of the panzers were knocked out, twelve of the Grants were also hit and were soon burning furiously leaving a sizeable gap in the British defences. The Germans gingerly moved towards the gap into the setting sun until they had been drawn to within 300 yards of the waiting 1st Rifle Brigade anti-tank screen, where they were caught in the full blast of highly accurate and concentrated fire, augmented by heavier artillery fire from the surrounding hills. Instinctively the panzers charged forward at this anti-tank screen and overran the forward platoons, only to run into several more squadrons of Grants. The panzers turned and sped for the protection of their 88mms, confident that the Grants could be drawn onto their own anti-tank screen, but the Grants on this occasion did not follow up, leaving 21st Panzer licking their wounds after having suffered severe losses with nothing to show for the day’s work. Meanwhile, 15th Panzer had tried to attack 133 and 131 Brigades on Alam Halfa but ran into two minefields and then into such a concentration of artillery fire that they were forced back into the soft sand below the ridge without having located any of the infantry positions. Furthermore, when darkness came 44th Divisional Artillery continued to fire all night, since ammunition stocks were plentiful, while the RAF carried out a long session of pattern bombing on the eastern flank which caught the German reconnaissance units in the open desert and wrecked several of their vehicles.
Next morning only 15th Panzer Division had sufficient petrol to mount an attack. The division moved off shortly after first light and probed forward to the western end of 133 Brigade’s positions, to find themselves caught in another devastating artillery bombardment and then attacked along the ridge from the east by a mixed force of Grants and Crusaders from 10th Armoured Division. Although the panzers knocked out seven of the Grants for the loss of two of their own Mark IIIs, by early afternoon 15th Panzer were back at the positions from which they had started. That evening Rommel gave the order to break off the attack and withdraw down the route of the advance.
On the 3rd September the 5th Brigade of the New Zealand Division and 132 Brigade were ordered to make controlled counter-attacks from the north to cut the enemy’s retreat through the minefields. Unfortunately Operation Beresford was a failure for a number of reasons. Rommel had anticipated these attacks and had placed his newly arrived parachute units, the German Ramcke Brigade and the Italian Folgore Division, as a block, from which the 4th and 5th Royal West Kents met very strong resistance and suffered heavy casualties. Further east the New Zealand attack lost direction and some supporting tanks were very roughly handled, losing twelve Valentines and leaving one of the forward battalions unpleasantly exposed. After taking almost 1,000 casualties Operation Beresford was called off.
During the battle 131 Brigade had not actually been in contact with the enemy, although they were divebombed several times and there was some shelling to their front, However, they were well dug in and had few casualties. On the 5th September 132 Brigade returned to 44th Division, and 131 Brigade organised food and rest for them. The 1/7th Queen’s looked after the 5th Royal West Kents, and the 2i/c, Major R.H. Senior, DSO was appointed to the temporary command of 5th Royal West Kents. By the 6th the Axis forces were back through the minefields, retaining only Munassib and the twin peaks of Himeimat. General Montgomery was not yet ready to follow up, and so the battle of Alam El Halfa ended.
Four days later 44th Division carried out their proposed relief of the New Zealanders, and were in turn relieved on Alam Halfa Ridge by the 51st (Highland) Division, which had also recently arrived in the theatre. 133 Brigade left to become the lorried infantry brigade for 10th Armoured Division but the 151st Infantry Brigade from 50th Division and the Greek Brigade were attached to 44th Division, which left 131 Brigade free to prepare a new position further to the south-east on a ridge later known as the Hog’s Back. They occupied this position on the 13th September, where there was some shelling but no casualties, and many patrols were carried out through the Nuts minefield.
On the 15th the 1/7th Queen’s relieved the 2nd Rifle Brigade on a wide frontage behind Nuts and May minefields. Patrols had established that the enemy was holding the Munassib Depression as a key position in the defence of the January and February minefields, and the new commander of XIII Corps, Lieut-General B.G. Horrocks, decided to capture the area for extra artillery deployment in future operations. 131 Brigade was detailed for this task. Consequently the Brigade was relieved by the Greek Brigade on the 23rd September and went back into reserve in order to train for this operation, codenamed “Braganza”.
The depression resembled a wide, irregular river-bed, with precipitous sides which dropped about fifty feet below the surrounding desert. Near the south side of the depression there was a ridge within the depression about 1,200 yards long, with two spot-heights on it, Points 94 and 92. Just beyond the Points 94 and 92 ridge and external to the depression was a low hill, Hill 101. Both these features were held by the enemy, thought to be elements of the Trieste Division. On the north side there were two minefields, the nearest in an area known as The Pimples, and another about half a mile further west beyond a re-entrant and a spur in the depression’s lip. The Brigade’s plan was that 1/6th Queen’s would attack on the right along the northern lip, with its final objective as the spur and re-entrant between the minefields, whilst 1/5th Queen’s on the left was to capture Points 94 and 92, and Hill 101. 1/7th Queen’s was to be in reserve at the eastern end of the depression. A full rehearsal was carried out on the 28th and went smoothly.

The Attack on Deil El Munassib.
The attack took place on the night of the 29th/30th September with an approach march of seven miles by MT and two miles on foot. The Scots Greys protected the left flank, and the route was marked by lights laid out by the Divisional Provost Company. The barrage, provided by nine field regiments and a troop of mediums, came down at 5.25am and was most impressive. The 1/6th Queen’s were well up with the barrage and as soon as it stopped they were on their first objective at The Pimples. There was no opposition, so the forward companies pressed on to the final objectives without casualties. They found a number of positions already dug on their objectives and these were occupied at once and they consolidated to prepare for the possibility of a counter-attack. There was a good deal of difficulty in getting their carriers and anti-tank guns up to their positions as they had to be brought up through the eastern minefield, with no known gaps in it, under heavy shelling. Capt J.H. Mason, the Anti-Tank Platoon Commander, brought them up with great dash, with the loss of two carriers and two anti-tank gun portees. His batman/driver was hit in the cheek by a small piece of shrapnel which went through his cheek and which he spat out. John Mason looked at him and shouted “Go on. You’re quite all right”, so the batman did not know until five minutes later that he was wounded when he felt the blood. Explaining this later, the batman said that as Capt Mason had told him that he was alright, he had supposed that that must be so, and so he had carried on! 1/7th Queen’s also had little difficulty in occupying their positions, only encountering spasmodic shelling.
Since the 1/5th Queen’s final objective, Hill 101, was some 3,000 yards from the start line, they started their advance 10 minutes before the barrage began. The attack was planned so that ‘C’ Company should descend the depression and advance on to the Points 94 and 92 ridge with Point 94 as its objective, whilst ‘A’ Company followed up and occupied Point 92. Meanwhile ‘D’ Company’s objective was Hill 101, with ‘B’ Company in support about 1,200 yards back on the southern lip of the depression. What happened to the various sub-units of this battalion, and whether they reached their objectives or not, is very obscure, since ‘A’ and ‘D’ Companies were lost without a single survivor, whilst in ‘C’ Company neither of the officers and less than half of the other ranks returned.
The survivors of ‘C’ Company reported that the company arrived at a minefield as the guns stopped. The defensive wire was not formidable, and they were able to step over it and continue on; but three red Verey lights were fired and heavy mortar, machine-gun and rifle fire was brought down on them. A number of oil mortar bombs were also fired at this stage, which threw out a burning liquid to about a 15 yards radius, two men being slightly wounded. They would appear to have been used for illuminating purposes, and were not used when daylight came. The whole company, except a few stragglers and about a dozen casualties, got through this minefield, but shortly afterwards 13 Platoon was separated to the left and 14 Platoon to the right, both to clear out pockets of enemy resistance. When they got up to the top of the ridge they found that Capt Berdoe Wilkinson, the Company Commander, had gone on to Point 94 with 15 Platoon without waiting, and had run into heavy defensive fire. It was said that during this fire fight ‘A’ Company had gone past toward Point 92. 13 and 14 Platoons were in the meantime pinned down and unable to use their weapons since 15 Platoon was between them and the enemy. A shell was seen to burst very near the Company Commander, and that was the last that was definitely known of 15 Platoon. 13 and 14 Platoons withdrew when it became light, and in all there were 51 other rank survivors from ‘C’ Company. Later two signallers also got back after dark the next night. The FOO, from 57th Field Regiment RA, with ‘C’ Company, lost his carrier and all his equipment, and was forced to withdraw wounded. It is thought that the barrage probably did not hit the top of the Points 94 and 92 ridge, but fell on its northern and western sides only. There is little doubt that friendly artillery fire failed to put out of action many of the mortars and machine-guns, and the enemy seems to have had plenty of time to man their positions when the barrage lifted. It is probable that there was at least a company of parachutists from the Folgore Division on this feature.
Many years later Ernest Norris, a NCO with ‘A’ Company during this attack, described his experiences, which throws considerable light on the fate of ‘A’ Company:
“I don’t know by how much but we were certainly delayed. The creeping barrage was too far in front of us but we couldn’t change that. We fixed bayonets, formed up in line and were given the order, “Forward”. At the time I felt pretty good, proud even. Our barrage was going on ahead and gave us a feeling of protection. Then suddenly the barrage stopped; you feel so naked you can’t describe it.
In a matter of seconds they were firing tracer bullets at us. It was still dark and I was aware of the tracer coming towards us-they seemed too slow to be bullets. But there were men getting killed and wounded all around. Captain Clark was mortally wounded and I heard him call out, ‘Carry on, Mr Cole-Biroth. I’ve been hit.” Then my Bren-gunner screamed and went down. I mentally panicked. You don’t know what’s happening. By then it was almost daylight. We got down behind what cover we could find. I looked round: Captain Clark was dead, Mr Cole-Biroth was pretty badly wounded and Mr Whittaker had most of his face shot away, We had no officers left.
We were so close to the enemy that they could see us clearly and they began mortaring us. And as we’d gone past enemy machine-gun posts in our advance we were being fired at from behind as well as in front. We couldn’t move forwards or backwards but we tried to reply to their fire as best we could. Eventually we heard voices and we knew the enemy were coming for us. Then we saw them standing above us and making signs to throw our rifles down and come out. And that’s what we did.”
How many were casualties and how many were taken prisoner is not known. Later in the day it was observed from an OP that there were two rows of triple dannert and some cattle fencing which lay on the south side of Point 92, and it seems likely that ‘A’ Company was stopped by this, found themselves completely boxed in, and were fired at from three sides.
‘D’ Company was seen going towards its objective, and some witnesses reported that they reached Hill 101 but came under heavy enemy fire from a company in a reverse slope position. However, ‘B’ Company heard shouting and screaming in the low ground about 500 yards on the near side of Hill 101, and later some observers said that they saw about 90 men being taken away as prisoners, but whether all these were ‘D’ Company personnel or were made up from ‘A’ and ‘C’ Companies is not known. A list of prisoners held by the Italians was captured by the Carrier Platoon later near Benghazi, showed the name of Sergeant K. Henty of ‘A’ Company, and another document which came into the hands of 1/5th Queen’s soon after the commencement of the Battle of El Alamein stated that one senior officer and four other officers were captured in the Munassib battle by units of the Folgore Division. Eventually it was confirmed that Major J. Dewsnap, OC ‘D’ Company, Lt R.A. Cuffley (‘D’ Company), Lt J.P.H. Cole-Biroth (‘A’ Company) and Lt J.N. Jenoure (‘C’ Company) were all captured, whilst Lt D.J. Whittaker (‘A’ Company) died from his wounds. Capt D. Urling Clark, MC, OC ‘A’ Company, Capt M.A.. Berdoe Wilkinson, OC ‘C’ Company, Capt J.J.T. Salmon, 2i/c ‘D’ Company, and Lt D.J. Mann of ‘D’ Company were all killed, and over 60 per cent of ‘D’ Company were killed or wounded before the survivors surrendered. Most of 15 Platoon were taken prisoner with their wounded commander Lt Jenoure.
‘B’ Company eventually consolidated a little to the south-east of their objective. They were in a very exposed position and endured heavy mortar and machine-gun fire for most of the day without being able to do a great deal by way of retaliation. Half an hour after first light a squadron of Grants of the Royal Scots Greys, accompanied by some Stuarts, moved up on the left flank, and the shelling increased. There was also some 88mm anti-tank fire too, but the presence of the Scots Greys in the area denied that flank to the enemy for the rest of the day.
Towards the evening ‘B’ Company, 1/6th Queen’s was especially heavily shelled and a counter-attack could be seen forming up. Major A.R. Trench, MC, accompanied by CSM Stratford, went from platoon to platoon and directed the fire of all his weapons, including that of the MMGs under his command, on to the enemy. While bringing up extra ammunition he was severely wounded in the leg, but continued to shout encouragement to his company until the attack was beaten off. Unfortunately, both Major Trench and CSM Stratford died in hospital of their wounds.
An attack by 1/7th Queen’s on Hill 101 and the Points 94 and 92 ridge after dark was contemplated, and 2nd Buffs was placed under command of 131 Brigade to take over the eastern side of the depression. Owing to the difficulty of securing a suitable start line and other administrative problems, this was postponed until 3.00am. However, by then the general alertness of the enemy finally caused the attack to be abandoned. It was decided instead to stabilise the positions gained on the north and east sides of the Deir El Munassib during the 1st October. 1/5th Queen’s was withdrawn into reserve to the area of Cairn 88, northeast of The Pimples, and that evening 2nd Buffs reverted to command 132 Brigade. The Scots Greys returned to 7th Armoured Division during the night of the 1st/2nd October. That same night a new minefield was laid by the 11th Field Company RE from the south-eastern end of the depression southwards and then eastwards, where it joined with the existing Nuts minefield.
On the night of the 3rd/4th October 131 Brigade was relieved by 132 Brigade, and went back to the ‘Hog’s Back’ position. Total casualties during Operation Braganza had been 12 officers and 260 men of the 1/5th Queen’s; and 4 officers and 52 men of 1/6th Queen’s, which included Major J.R. Priestley, OC Headquarter Company, who was killed by a mine almost at the end of the operation.
Operation Braganza had met with only limited success, but it certainly served a good purpose in attracting the attention of the enemy towards the south and away from the future scene of the Eighth Army’s main attack. Munassib was a much tougher proposition than had been anticipated, with the Folgore parachute troops proving themselves to be well trained and reliable, almost to be compared with the German formations. Munassib was unsuccessfully attacked again during the main battle, and was only occupied when the enemy finally withdrew along the whole front.
« Previous ![]() Back to List
Back to List ![]() Next »
Next »
Related
